Tampilkan postingan dengan label Nails. Tampilkan semua postingan

Jumat, 30 Desember 2011

HAPPY NEW YEARS: NYE OUTFIT, MAKEUP, HAIR, NAILS, ACCESSORIES + WHAT I CARRIED IN MY CLUTCH!

Hey girls,
This is going to be all about New Years Eve! What I wore, how I did my makeup, how I painted my nails, how I styled my hair, accessories I used, what i carried in my clutch and everything like that! This is like a FOTN, OOTN, NOTD, HOTD and what's in my purse all rolled into one huge post! I really hope you enjoy reading this!
 This is just an overview of everything :) Keep reading to see everything in more detail!
 Makeup
I wanted the main focus of my makeup to be my flase eyelashes so I didn't go too crazy with the eyeshadow or lips. I'm wearing MAC Electra eyeshadow and MAC Forgery on my lid, MAC Black Tied in my crease and Vanilla as a highlight. I used my Chanel Liquid Eyeliner to create a winged out look and I set that with my MAC Black Tied eyeshadow. I'm wearing Ardell Demi Lashes and I didn't cut them or anything, I just put them straight on with some eyelash adhesive I already had because they didn't come with some. I'm wearing on my face Chanel Matt Lumiere foundation and Pressed Powder, Studio Sculpt concealer, Chanel Soleil De Tan bronzer and MAC Ladyblush Creme Blush. On my lips I'm wearing MAC Lustering Lipstick with MAC Petite Indulgence Creme Sheen over the top. I really like the way it turned out because I hate using false lashes and looking over the top but because I went pretty basic with everything else, the lashes didn't seem so dramatic.
 Purse
I used the little wrislet that came with my DKNY Golden Delicious perfume which was a perfect size and held everything I needed it to for the night! It also perfectly matched the gold heels of my shoes which was awesome. I also loved how it had a chain you could hold it from or you could put the chain inside the purse and just carry it like a clutch. Scroll down to see the things I brought with me for the night in this purse.
 Nails
I wore OPI Shorts Story with OPI Happy Anniversary over the top. Shorts Story on it's own has no shimmer and is a fairly light pink but when you put the shimmery white colour Happy Anniversary over the top, it creates a gorgeous sparkly fairy floss pink! I also used OPI Alpine Snow and a nail brush to draw a quick little design on my thumb nails, I didn't have the patience to do all of my nails haha! The main reason I chose to make my nails this colour was because it perfectly matches the shade of pink in my shoes!
 Ring
I just wore my white gold diamond ring that I wear everyday! Mixing metals is a huge trend so I wouldn't usually mix gold and white gold together but I decided to try it out.
 Shoes
I wore my Guess Billows which I bought especially for NYE and kind of based my whole outfit off. You can read the crazy adventure I went through buying these shoes on boxing day here. For 5 inch heels they are suprisingly fairly easy to walk in and quite comfortable.
 Hair
I actually went really simple with my hair! I washed it using John Frieda Sheer Blonde Moisturising Shampoo and conditioned with Macadamia Oil Hair Masque. I used Nak Moroccan Argan Oil when I got out of the shower then blowdried. I used Redkin Satin Wear as my heat protectant and straightened my hair with my usual straightener. I was going to curl my hair but didn't have time to wash it the night before and my curls don't last at all if I wash my hair right before I do them so I just straightened.
Necklace
I also wore my white gold diamond necklace I always wear which is a very simple item but adds a lot of detail. 
 Cardigan
I always bring a little jacket or coverup when I go out so because it's NYE and I was going to be out at least past 12, I brought one of my warmer cardigans for when I got cold. It's a very basic black but has some really cute lace detailing at the back and top at the front.
 Skirt
I was just wearing a basic black bandage skirt which is a really simple fashion piece but is a wardrobe staple! I always wear a bandage skirt when I want my outfit to be a bit dressier than if I wore mini shorts or jeans. It hugs and accentuates any curves you have which is great if you want to look a little more curvier.
Top
I was deciding wether to go with a really crazy sparkly sequin top or something more simple and I ended up going with this plain black blouse because I think it really allows my hair, makeup, purse and shoes to have more attention! It's a really lovely top by the brand Filo and is super detailed! It has really gorgeous details on the shoulder straps and a very low back. It's also synched in at many places and has this sort of piece of fabric that hangs of the actual shirt that I tried to show in the pictures above.

What I Carried In My Clutch
 So I have already mentioned this but this is the clutch that I got as a gift with the DKNY Golden Delicious perfume. It was perfect for NYE and fit everything I needed it to! It also perfectly matched my shoes which was a bonus!
 So here's a little overview showing you how everything sort of had it's own little place.
 Bobby Pin- To get my fringe out of my way.
Headband- In case I decided to put my hair up.
Eyelash glue- In case my lashes decided to fall off, which they didn't thank god!
Perfume- A cute little mini perfume sample to freshen up.
Breath mints- At events like NYE, it's usually pretty loud and you have to talk close to people's faces so you don't want to have bad breath, that's just gross! Also, Listerine PocketPaks are very slim and portable so they don't take up much room in your purse!
 Mirror- A cute little hand mirror to help me when re-applying my lipgloss or using blot film.
Blot Film- I love the MAC ones for when my skin gets oily and if my powder doesn't fit in my purse.
Lip Products- I always bring the lip colours I'm wearing to touch up wherever I go.
 I was wearing MAC Lustering Lipstick and MAC Petite Indulgence Creme Sheen Gloss so I brought them to touch up!
 I always carry cash, ATM cards, ID and transport passes when I go out!
They fit perfectly into this little pocket of my clutch so it keeps them safe.

 Phone Case
The phone case I was using is just this plain white sparkly gem one. Pretty basic and not one of my bedazzled ones because they didn't fit into the clutch as well and this simple one did.

New Years Resolutions
♥ Start making videos on my Cooking Channel.
♥ Start eating healthier and exercising.
♥ Appreciate the little things in life more.
♥ Stress less.

Whoever you were counting down to midnight with, I hope you had a lovely New Years Eve!
Thank you so much for reading and I look forward to a beauty filled 2012 with you lovely girls!

Minggu, 27 November 2011

NOTD: PINK, WHITE AND BLACK STRIPES

Hey girls,
I was playing around with some nail tools I bought the other day and came up with a few designs so I thought I would share them with you!
I went with a black, white, pink and silver theme but I think it would be really cute to do green, red, white and silver closer to Christmas for festive nails.
 For the first design, I painted the base coat white then painted an angled corner pink and joined the two colours with a silver glitter line.
 For the second design, I painted the base colour as black then painted pink angled stripes one way and white angled stripes the opposite way, putting silver glitter polish over the white stripes.
 The last design I did was just a pink base coat with a white angled line, splitting the nail in half and putting a line of silver glitter polish in the middle of the white line.

Rabu, 23 November 2011

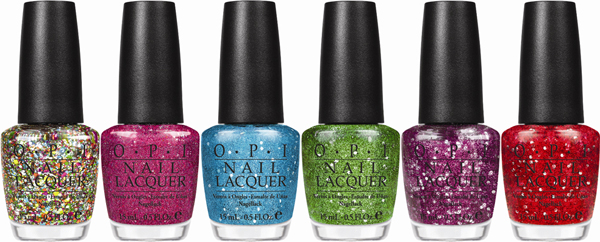
THE MUPPETS COLLECTION

Hey girls,
I have recently been really getting into nail polish! So i was super excited when i stumbled upon the new OPI "The Muppets" collection and decided to pick up a few colours. The whole collection is gorgeous and especially the glitters are spectacular but a single OPI nail polish in Australia is $20 and i didn't want to break the bank so i only picked up three, each with a reason behind why i chose them!


The first colour that caught my eye was "Rainbow Connection" and from first sight i instantly knew i had to have it. I had however seen this nail polish prior to really seeing it because when i was getting my nails done a week or so ago i noticed this one on the shelf and died at it's beauty but was devestated when there was no label on the bottom and noone in the salon knew what it's name was. I later saw this colour on a couple of blogs so i found out the name and went shopping the same day for the single purpose of picking up this polish which i never thought i would ever find again!
So there isn't really one significant colour you can refer to this polish as apart from rainbow! There is a mixture of silver, green, pink, gold, red and blue glitter in clear nail polish.
The glitter goes on very sparse so to achieve a super packed on glittery look you need at least 3 coats and i recommend a base coat of black or white so the glitter shows up well.
I couldn't contain my happiness when i realised that "Rainbow Connection" perfectly matches a dress i love and own. If you read my previous post about this dress then you would know i have it in both cream and black. So I would probably wear a black or white base under the glitter polish depending on what shade of the dress i was wearing so it matched my outfit exactly.
The next two polishes i picked up from "The Muppets" collection were festive purchases in preperation for Christmas!
"Gettin' Miss Piggy With It" is a clear polish with vibrant red glitter specks and particles with some silver specks mixed in also.

I don't usually go for greens but i had to stop myself from purchasing the blue one because i already have way too many blues in my collection. The green is a great change of pace and reminds me so much of Kermit!
"Fresh Frog Of Bel Air" is a clear polish with vibrant green glitter specks and particles with some silver specks mixed in also.
Both "Gettin' Miss Piggy With It" and "Fresh Frog Of Bel Air" are extremley versatile and can be styled in many festive ways. You could put silver polish underneath them both if you didn't want your green and red to be too contrasting and kind of still match. You could put red and green nail polish underneath the glitter to really enhance the colours. You could also use either black or white depending on what your wearing.


Please tell me if you pick up anything from this collection and what you think about it!

Senin, 21 November 2011

NAIL TUTORIAL: CUPCAKE NAILS

Hey girls,
I have another nail tutorial for you and this one is how to get super cute cupcake nails. This was my first attempt so please excuse all of the mistakes i made but hopefully you can get the idea.
Step #1: Prepare your nails. Buff, shape and shine however you like to. Paint on your favourite base coat, nail hardener or whatever you like to put on your nails before you put polish on. This step is completely up to your personal preference.
Step #2: Apply a different colour to each nail. Paint as many coats on as you need to get a good solid colour. I'm using pastel colours because they remind me of cupcakes.
 Peachy coral for my middle finger, butter london "Trout Pout".
This beauty pastel peach kind of reminds me of salmon but i love that about it and the best part is that it goes on super smooth, precise and pigmented. I only need one coat to give me a solid colour but it's pretty expensive and retails for $22!

 Pastel yellow for my pinky, BYS "Bright Lights".
I love this colour because it is the first yellow i have find that is a perfect pastel milky yellow and doesn't look gross or streaky on the nails like OPI "Need Sunglass" and "The It Colour". All BYS nail polishes are only $4 so it is an absolute steal to find such and affordable but amazing colour.

 Baby blue for my index finger, OPI "No Room For The Blues".
I used this gorgeous pastel blue in my last tutorial and i am absolutley obsessed with this colour! So in for Spring and it's versatility is unbelievable. All OPI polishes are $20.

Milky green for my ring finger, OPI "Gargantuan Green Grape".
This is a great variation of a mint polish which was huge last Spring, it's a bit lighter and less teal than the true minty colours so it's a great milky pastel which reminds me so much of cupcakes. All OPI polishes are $20.

Candy floss pink for my thumb, OPI "Shorts Story".
This colour is probably my favourite that i used for this tutorial. A fun bubblegum pink thats really girly and gets me back in touch with the days i used to play with Barbies but is still very mature and wearable. All OPI polishes are $20.

Step #3: Using a white nail polish, create "icing" on the tips of your nails. Try applying the polish on in 3 strokes, creating what looks like cupcake frosting.
 The white i used to create the icing is OPI "Alpine Snow".

Step #4: Decorate your cupcakes any way you like. I added sprinkles, a cherry and white/silver glitter lines to create the look of cupcake papers.
 I used OPI "Big Apple Red" to create a dot at the top of my nail to look like a cherry.
 I used OPI "Apline Snow" to draw the lines which ressemble cupcake wrappers and then used Rimmel "Your Majesty" over the top to give some silver glitter.


Finish off with a top coat and your done! I hope you girls liked this really cute cupcake tutorial! If you have any suggestions for my next nail tutorial please tell me in a comment below!